Treasured Family Recipe: Soft & Chewy Holiday Caramels
There's something uniquely magical about the holiday season – the twinkling lights, the cozy gatherings, and of course, the irresistible aroma of homemade treats. Among these cherished traditions, a batch of perfectly soft and chewy homemade caramel stands out as a true culinary delight. Imagine biting into a melt-in-your-mouth caramel, rich with buttery sweetness, its texture yielding just right. This isn't just any candy; it's a nostalgic journey, often a family secret passed down through generations, and always a gift from the heart. This article will guide you through crafting the most exquisite homemade caramels, a recipe so beloved it's been perfected over decades in countless family kitchens. You'll discover that achieving this level of confectionery excellence is simpler than you might think, requiring only a handful of pantry staples and a little patience. Get ready to create edible gold that will become a treasured part of your holiday celebrations.Why These Holiday Caramels Will Become Your New Tradition
This isn't just another sweet treat; it's an experience, a tradition waiting to be born in your kitchen. Here’s why this particular homemade caramel recipe is destined for your holiday rotation:- A Cherished Family Tradition: For generations, this very recipe has been the heart of holiday gifting. My family, like many others, found immense joy in making these caramels around Christmas, carefully wrapping each one to share with friends and neighbors. It’s more than just a food gift; it’s a tangible piece of holiday cheer, a taste of home and hearth. The process itself becomes a memory-making activity, bringing loved ones together in the kitchen.
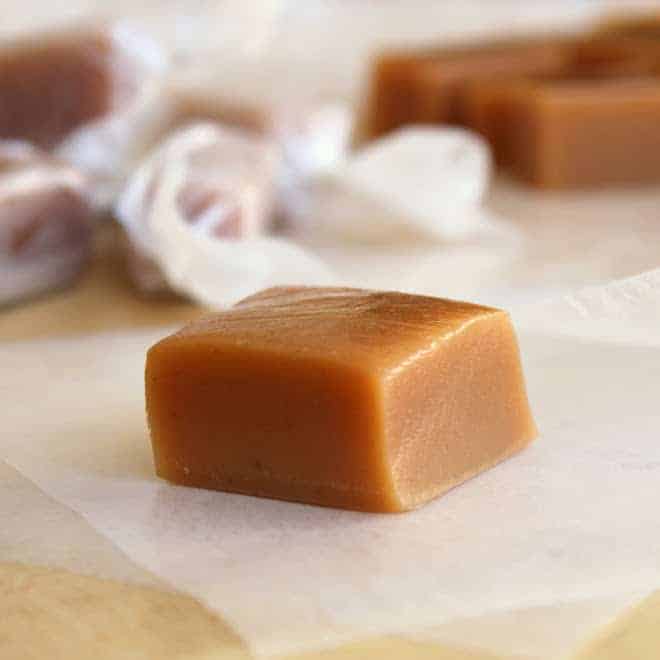
- Simply Perfect Texture & Flavor: The hallmark of these caramels is their unparalleled texture. They are incredibly soft, luxuriously chewy, and truly melt-in-your-mouth delicious. They strike that delicate balance between firm enough to hold their shape, yet pliable enough to indulge in without effort. Every bite delivers a rich, buttery sweetness that is utterly addictive, making them truly the best homemade caramel you’ll ever taste.
- Surprisingly Easy to Make: Despite their gourmet appeal, this caramel recipe uses simple, accessible ingredients you likely already have in your pantry: butter, sugar, corn syrup, evaporated milk, and vanilla. The steps are straightforward, making it an ideal project for both novice and experienced candy makers. While patience is key during the cooking process, the techniques are forgiving, ensuring a successful batch every time. The magic lies not in complexity, but in mindful execution.
The Magic Behind Perfectly Soft & Chewy Caramels: Essential Ingredients & Gear
Creating truly spectacular homemade caramel starts with understanding your ingredients and having the right tools. You don't need fancy equipment, but a few basics are non-negotiable for success.Key Ingredients:
- Butter: High-quality unsalted butter is crucial for that rich, creamy flavor and tender texture. It adds a luxuriousness that cannot be replicated.
- Granulated Sugar: The foundation of any good caramel, providing the sweetness and structure.
- Light Corn Syrup (Karo Syrup): This is your secret weapon for preventing crystallization, ensuring your caramels stay smooth and chewy, not grainy. It also contributes to the desirable pliable texture.
- Evaporated Milk: Unlike regular milk, evaporated milk is concentrated, richer, and less prone to curdling under high heat, providing a deep creamy base for your caramel. It's essential for achieving that classic caramel color and flavor.
- Vanilla Extract: Added at the end, vanilla rounds out the flavor profile, adding warmth and depth to the sweetness. Opt for pure vanilla extract for the best results.
Essential Equipment:
- Large, Heavy-Bottomed Saucepan: This is arguably the most critical piece of equipment. A heavy bottom distributes heat evenly, preventing scorching, which is a common pitfall in caramel making. Its large size is also crucial to accommodate the mixture as it boils and expands, preventing messy boil-overs.
- Sturdy Whisk or Heat-Resistant Spatula: For constant stirring. A silicone spatula is excellent for scraping down the sides.
- Measuring Cups and Spoons: Accuracy in measurements is important for consistent results.
- 9x13 Inch Baking Pan: Lined with parchment paper and lightly greased for easy removal of the set caramels.
- Ice Water Bath: A bowl filled with ice water, essential for the reliable "ice water test" to determine doneness. More on this crucial technique later!
- Optional (But Recommended): Pastry Brush: For brushing down sugar crystals from the sides of the pan with water, ensuring a smooth caramel.
Step-by-Step Guide to Crafting Your Homemade Caramels
Making homemade caramel is a delightful process that unfolds in distinct stages. Follow these steps carefully, and you’ll be rewarded with a perfect batch.- Combine & Initiate the Boil:
In your large, heavy-bottomed saucepan, combine the butter, sugar, and corn syrup. Place the saucepan over medium heat. Stir constantly but gently as the ingredients melt together. Your goal here is to dissolve the sugar completely before the mixture starts to boil. This initial stage usually takes about 5-10 minutes. As soon as the mixture begins a steady boil, proceed to the next step.
- Gradually Incorporate Evaporated Milk:
This is arguably the most critical step for achieving smooth, luscious caramels. With the mixture at a constant boil, begin to very gradually add the evaporated milk. Add it in small increments – a little splash at a time – stirring constantly. The key here is to maintain a constant boil throughout this process. Adding the milk too quickly or allowing the temperature to drop significantly can shock the caramel base, leading to curdling. This slow addition should take about 12-15 minutes *per can* of evaporated milk. If you're using two cans, allocate at least 25-30 minutes for this step. For a slightly faster process that still respects the chemistry, you can gently warm your evaporated milk in a separate saucepan before adding it.
- Caramelize to Perfection: The Firm Ball Stage:
Once all the evaporated milk is incorporated, continue stirring the mixture constantly over medium heat. Don't forget to periodically scrape down the sides of the pan with your spatula to prevent sugar crystals from forming and burning. As the caramel cooks, it will thicken and darken in color, gradually transforming into that familiar golden-brown hue. This stage requires patience, as it can take quite a while. The goal is to reach the "firm ball stage."
While some recipes suggest using a candy thermometer, I (and many seasoned candy makers) find the "ice water test" to be the most reliable indicator of doneness, especially given variations in altitude and thermometer calibration. To perform the ice water test: drop a small spoonful of the hot caramel into a cup of ice water. Let it sit for a few seconds, then remove it with your fingers and try to mold it into a ball. When the caramel is ready, it should feel pretty firm and pliable – you can form a distinct ball, but it's not hard or brittle. It should offer some resistance when squeezed but still be soft enough to indent. For a comprehensive guide on mastering this technique, check out our article: Foolproof Homemade Caramel: Master the Ice Water Test.
Once you’ve reached the firm ball stage, immediately remove the saucepan from the heat and stir in the vanilla extract. The steam and aroma will be intoxicating!
- Cool & Set:
Pour the hot caramel evenly into your prepared 9x13 inch pan (lined with parchment paper and lightly greased). Do not scrape the bottom of the pan as this can introduce burnt bits. Allow the caramels to cool completely and harden. For the best results, refrigerate them overnight, or for at least several hours. This chilling period is crucial as it makes the caramels much easier to cut and wrap cleanly.
- Cut & Wrap:
Once thoroughly chilled and firm, remove the slab of caramel from the pan by lifting the parchment paper. Place it on a cutting board. At this point, the caramel will feel quite hard from the refrigerator, but it will soften beautifully at room temperature. Use a sharp, lightly greased knife to cut the caramel into small, bite-sized pieces. If desired, wrap each piece individually in wax paper or cellophane, twisting the ends like a classic tootsie roll. This not only makes them look festive but also prevents them from sticking together.
Mastering the Art: Tips for Foolproof Caramels Every Time
While the steps for homemade caramel are straightforward, a few expert tips can elevate your results from good to absolutely phenomenal.- Patience is a Virtue, Especially with Evaporated Milk: Reiterate the importance of slowly adding the evaporated milk. This isn't just a suggestion; it's vital. Adding it too quickly can cause the caramel to curdle or become grainy, as the sudden temperature change can break the emulsion. Aim for that 12-15 minutes per can, maintaining a constant, gentle boil. If you want to speed things up safely, slightly warming your evaporated milk in a separate pan before adding it to the boiling sugar mixture can help reduce thermal shock.
- Maintain Steady Heat: Consistency is key. Keep your stovetop burner on a consistent medium heat throughout the entire cooking process. Fluctuations in temperature can affect the caramel’s texture and color, leading to uneven cooking or scorching. A steady heat ensures gradual and even caramelization.
- Trust the Ice Water Test (Ditch the Thermometer!): As mentioned, candy thermometers can be fickle. Altitude, calibration issues, and even placement in the pan can lead to inaccurate readings. The ice water test, however, measures the caramel's physical consistency, which is exactly what you need to know for perfect chewiness. Practice makes perfect with this method; you’ll quickly learn to recognize that "firm but pliable" feel.
- Don't Overcrowd the Pan: Always use a saucepan that is significantly larger than you think you'll need. Caramel mixtures expand quite a bit as they boil, and a cramped pan is a recipe for a sticky, overflowing mess. A 5-6 quart heavy-bottomed pot is ideal for most standard recipes.
- Resist the Urge to Scrape the Bottom: When pouring the finished caramel into your prepared pan, avoid scraping the very bottom of the saucepan. Often, slight scorching can occur on the bottom, and scraping this into your perfect batch can introduce undesirable burnt flavors.
- Keep Sides Clean: During the cooking process, use a wet pastry brush to gently brush down any sugar crystals that form on the sides of the saucepan. These crystals can fall back into the mixture and initiate further crystallization, resulting in grainy caramel.
Beyond the Basics: Gifting, Storage, and Creative Uses
Once your beautiful homemade caramel is made, the possibilities extend beyond simply enjoying them straight from the wrapper.Gifting:
These soft and chewy caramels make an incredible holiday gift. Arrange them elegantly in a decorative tin or a small box lined with tissue paper. Tie it with a festive ribbon, and perhaps include a handwritten tag with the recipe name – "Grandma's Treasured Caramels." They truly are a gift that speaks volumes, showing care and effort. Consider pairing them with other homemade treats for a delightful gourmet basket.
Storage:
Wrapped individual caramels can be stored in an airtight container at room temperature for up to 2-3 weeks. For longer storage, they can be refrigerated for up to a month or even frozen for several months. Just be sure to bring them back to room temperature before serving for that perfect soft and chewy texture.
Creative Uses:
While delicious on their own, don't limit your homemade caramel to just snacking!
- Drizzle: Melt a few caramels with a splash of cream to create a luscious caramel sauce, perfect for drizzling over ice cream, apple pie, pancakes, or even coffee.
- Baking: Chop them up and fold them into cookie dough, brownies, or use them as a delightful filling for tarts or cakes. Imagine a salted caramel cake with a rich, gooey homemade caramel center!
- Apples: Dip sliced apples (or whole small apples) into melted caramel for a classic autumn treat.
- Popcorn: Elevate your movie night by stirring melted caramel into freshly popped popcorn for a sweet and salty snack.
